The purpose of the toggle button in LDA toggle repair and terine/vaginal prolapse
repair is to reduce suture tension by distributing the pressure of the sutures over a wide
surface area. When used for umbilical hernia repair, the button serves as a flat surface
to contain the reduced hernia, held in place by glue and wrapped tape.
A. Use of Button in LDA Toggle Suture Repair
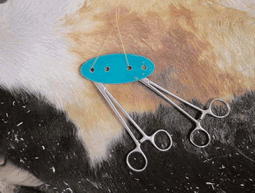
Step 1. After the two toggle sutures have been placed and clamped, according to the
instructions enclosed with the Grymer/Sterner® toggle suture repair kit, the 2 suture ends
are threaded through the holes in the button that most closely match the distance
between the 2 toggle sutures.

(LDA Repair - Step 1)
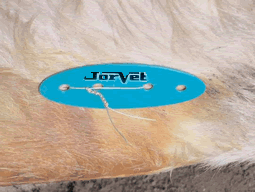
Step 2. A vertical distance of 3-4 inches (8-10 cm) should be left between the surface
of the button and the square knots, which
join the 2 toggle sutures. This distance
allows for normal anatomical shifting when
the cow returns to sternal recumbency,
reducing the likelihood of fistula formation
or pressure necrosis at the perforation site.

(LDA Repair - Step 2)
Step 3. It is not necessary to cut the sutures
or remove the button once the cow recovers.
However, it is important that the toggle
suture button remains in place for a minimum
of 12 days.
B. Use of Button in Uterine/Vaginal Prolapse Repair
Step 1. After the uterus/vagina has been replaced (returned to its proper position), horizontal
mattress sutures are placed through the holes in the button on each side of the
lips of the vulva.
%20%20B.jpg)
.jpg)
.jpg)
.jpg)
.jpg)
Step 2. Tie the suture knots at a tension appropriate to preclude re-prolapse.
.jpg)
.jpg)
Step 3. If the area of the repair warrants, 4 buttons (2 on each side) can be used to distribute
the tension of the sutures over a wider area, according to the surgeon’s preference.
%20%20B.jpg)
Step 4. Remove the sutures and buttons
when appropriate and the cow is no longer
straining.
C. Use of Button in Umbilical Hernia
Repair
Step 1. Small umbilical hernias can be
repaired by gluing a button to the hernia sac
using heat detector patch glue.
%20C.jpg)
.jpg)
.jpg)
.jpg)
Step 2. The hernia is then reduced and held
in place by wrapping the abdomen with several
rolls of adhesive backed elastic tape.
.jpg)
.jpg)
Step 3. Remove the tape and button after 2-3 weeks.
NOTE: not recommended for calves over 250 lbs. or for hernia repairs over three inches
in length.
|

